Showing posts with label beauty tips. Show all posts

Thursday, February 27, 2014

Dark Circles (dun dun dun...)

As an Italian woman, I feel that my dark circles are become more like black holes under my eyes. And worse--with age, I find them harder to cover up. If you read my recent beauty post, you know I have tried to tackle the root of the problem with Eye Hope in a Bottle by Philosophy (which is amazing by the way), but my results are not seen overnight. 

See what I mean!?

So, I have been trying to find a concealer that can truly disguise my dark circles. I was in search of a miracle, honestly. I needed the thickest, most life changing concealer that could make my under eyes appear bright, light, and well rested. On this hunt, I have tried a variety of concealers, then even more highlighters trying to find a solution. Now, I know it isn't concealer, foundation, powder, or even highlighter I needed, it was RED LIP LINER!

That's right beauties, red lip liner. My favorite beauty consultant at my local Ulta store, John, taught me the trick--and I can't wait to share. John, if you are reading this, you are fabulous!!! This is a great tip that I just couldn't keep to my dark eyed self. Women, this is a must try!!! He explained that the dark circles are really a hue of blue, which can be a combination of your blood and really thin skin. The reason I could not find this amazing life-changing concealer to cover this up is because concealers are skin colored. Using the red lip liner and a concealer (exactly the color of your skin) you can apply the mixture to combat the blue hue. Voila you have a dark circle corrector!

Let's begin by when to use this little trick in your makeup routine. After my primer, and right before my full face foundation I use this mixture in a half moon shape under my eyes. {Note: this is unlike my concealer that I apply in a triangle shape down the base of my nose. Keep this just on the dark circle areas--for me, that also includes the inside of my eyes, as seen in the pictures}. Once this genius mixture is ready, I cover with foundation, then concealer and continue with my regular makeup routine.

Step 1: Choose a creamy red lip liner. I am using Too Faces Perfect Lip in Perfect Red. Simply because John recommended it because of its consistency.


Step 2: Add some concealer. This is a darker color than my other concealer to help balance my skin tone. I am using Amazing Concealer by Amazing Cosmetics in Ivory. My everyday concealer is Bare Minerals Light 2. Then, mix them together with a concealer brush. Mine is from Bare Minerals. 


Step 4: Apply all over the dark circle areas in a half-moon shape. You can see how pink this looks! It has instantly taken away that blue black color.


Step 5: Cover with foundation and concealer.  Viola!


Here is the AFTER!

// Floral Blouse here // Pink Top H&M old similar here // Lips MAC Candy Yum Yum topped with I'm Passionate // Nails Essie Marshmallow //

Is this not the perfect way to Polish off your look!?
PLEASE PLEASE PLEASE let me know if you try this tip. I am now on day 3 and have really seen a difference, especially in my photographs. 

Thanks for stopping by!
--Kelsey

Instagram: @KelseyMKipp and @Courtney_m_B

Thursday, February 13, 2014

CLARISONIC Miracles!!!

OMG like OHHH M GEEE--If you have been living under a rock or haven't heard about Clarisonic, let me blow your mind {deep breaths, ladies-it is a life changer}. 

Before I get ahead of myself, I need to explain why this is SO important. Courtney and I built the Polished brand on the idea that we believe people need to appear Polished from head to toe. Let's be real--we have all seen a GORGEOUS looking women walking down the street in sweat pants and carrying a Coach bag. Just to be clear-not Polished. Remember, it's all about the details, skincare cannot be ignored. 

Why, you ask? Healthy skin is something spotted from across the room! When your skin looks tight, clean, fresh, and it glows! If a healthy complexion doesn't sway you, think about your makeup. Does it ever get flaky or refuse to last the day? HELLO--it's not your makeup, it's what is underneath it! So, in order to appear Polished (with fresh stunning makeup) you need to pay a bit of attention to your skin. 

With this in mind, I needed to do some research--Now, strictly business I treated myself to my first facial (research!). I learned A LOT! In case you care, my skin is combination... meaning I have average skin but spots of dry areas. Immediately I knew those spots because I can see the difference when I put on my foundation. These "trouble spots" result from lack of moisturizing. Honestly, this was frustrating to hear. I am great pretty good about taking off my makeup at night, quick wash, and ALWAYS lather on the Aveeno. Well, no more ladies! 

Finally, let the Clarisonic tribute continue. Research and logic aside, after my first use, I saw instant improvements with my skin. My dry spots are minimized and my skin appears so clean and fresh. It's a look I struggle to describe because clean doesn't truly express the difference. It's a must try! Although it is pricey, it's a must!! Trust me :)

My {New} Skincare Routine:
  1. Using a makeup wipe, I remove my makeup on my eyes and face. 
  2. Add a dab of face wash onto the brush. SIDE NOTE: You can use any face wash you wish, but be sure it does not have any exfoliation beads within it. 
  3. Run it under water.
  4. Now, it's time to wash. Best part-Clarisonic Mia 2 has it timed perfectly for you!! When you start the machine, it you feel the pause and hear the buzz it signals you to move to the next area on your face. PS I use the brush that came with the kit. 
  5. Start on your forehead for 20 seconds. Wait for the pause, then move to your nose and chin for 20 seconds. Finally, 10 seconds on each cheek. AND DONE!
  6. STOP after that. This is designed to give the perfect amount of clean. Just enough to get rid of the dirt, grime, and pollution, but not too much that could potentially harm your skin. 
  7. Now, it's time to moisturize! I start with a serum {Time in a Bottle by Philosophy} and then a moisturizer {MAC}. 
**I am loving my serum and moisturizer, but I would love to hear what else you readers are using. Any suggestions?! You know me, always looking for the next best thing. 

OK-time to go out and buy your Clarisonic, you will not be sorry! Please share your thoughts and experiences!!!

Thanks for stopping by,
Kelsey 

Follow us on Instagram @KelseyMKipp and @Courtney_m_B

Friday, February 7, 2014

Pink Pearl POP


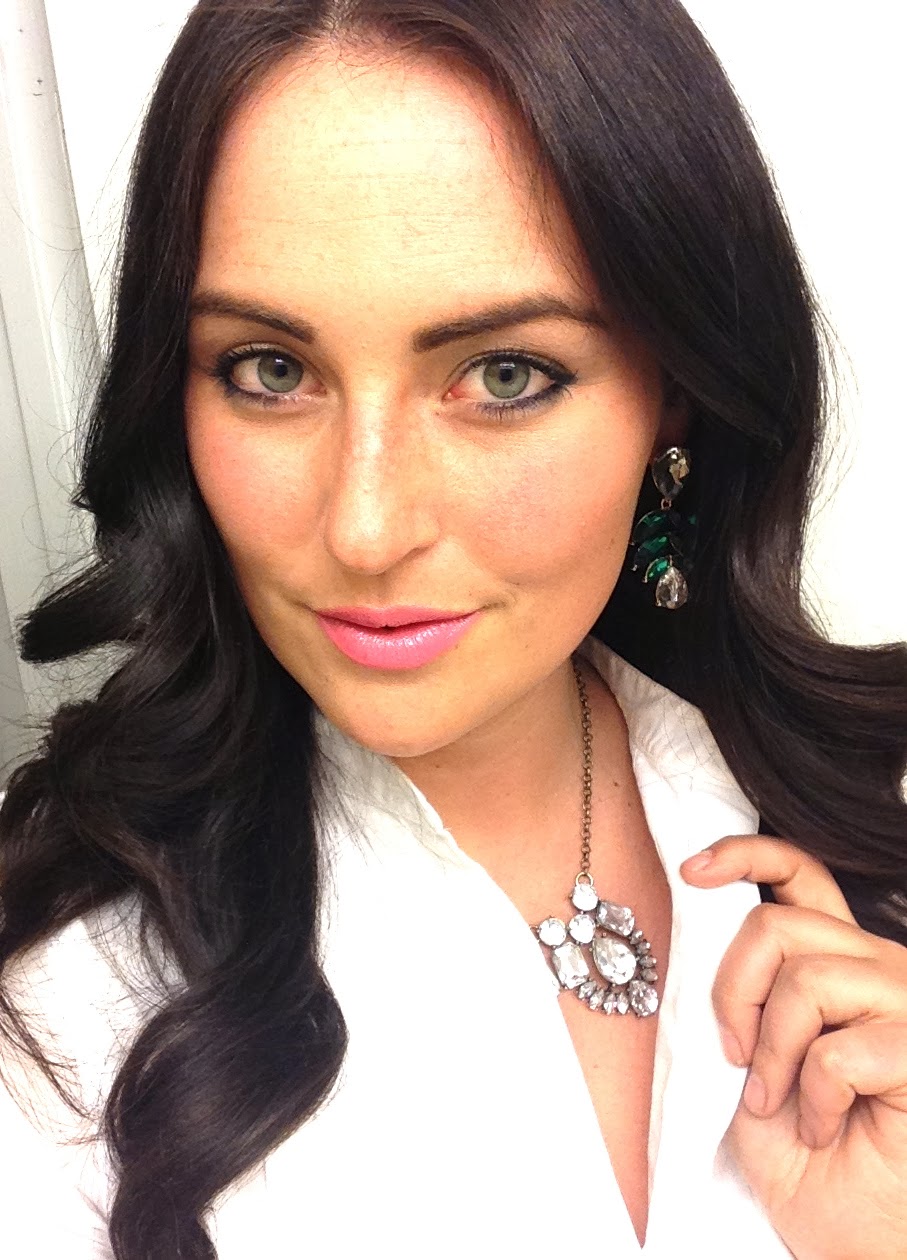
I LOVE winter. I love winter clothing, winter scenery, winter accessories, winter boots, winter activities, more winter clothing, and winter makeup. By winter makeup, I'm talking colors. Winter is the perfect time to break out a dark lip. Red, burgundy, oxblood, wine, you name it, winter loves it for a lip color! However, I like to switch it up every once in a while. Winter is not only for dark colors. It also screams white and pretty! I mean, mother nature dumps a coat of white all over for a few months because she knows it's pretty! What does pretty winter white need for a sidekick? PINK!

What I am about to say may shock you...

I am not a pink girl. I never have been. My favorite color is orange and my go to color for clothing is usually a neutral of sorts black. But, I do not shy away from pretty things. In this case, MAC's Pink Pearl Pop is oh-so-pretty. Searching for the right shade of winter pink was a challenge, which I totally accepted! I love this shade, and it took me a loooooong time to find.  I tried darker pink, brighter pink, nude pink, etc. Nothing was right. Then, on a random trip to NYC, a nice lady at the MAC store helped me find this shade (or flavor, as my students call it). Perfection. 

I love the pink and emerald color combination!


MAC Pink Pearl Pop
Charming Charlie Earrings (Similar here)
J Crew Necklace (Similar here)


Thank you for reading, my lovely Polished ladies!

XOXO-Courtney

For more beauty looks check us out on Instagram at @Courtney_m_b & @KelseyMKipp

Thursday, January 30, 2014

Just Wing It


Name an eyeliner trend and I have worn it! Bottom line only, yep. Top lash line only, definitely. Both lines, uh huh. Smudged eyeliner, sure did. Thick white eye liner, hey, I was in 7th grade once, okay. I have experimented with pencil liners, liquid liners, powder liners, colored liners, gel liners, and just about anything they offer in terms of eye lining tools/products. 

I don't tend to do a dramatic eye makeup look very often. I am proud to admit that I love my eyes (ladies, let's all just appreciate what we were given, there's nothing vain about that). The shape, size, and color (thanks, Mom!). So, I try to play up the feature and not do too much. Because of this, I always tend to revert to a simpler and more subtle eye liner. One thing I do know is that I have officially given up on pencil/stick eye liner. These liners go on too thick and I can't get the precision that I want. But, I would keep going back expecting it to be different! Isn't that the definition of insanity? Anyhow, I am more of a brush and powder/gel kind of gal. 

Lately, I have been hooked on cream/gel liners and a winged eye. Something about this eye look is classic, but trendy...totally Polished. People often ask me how I achieve this look without looking costume-y. The truth is, practice. I am no artist, trustttttt me! My drawing/painting abilities have been far surpassed by my 1st grade students (for real). Using a gel liner and a brush is literally like painting. So, what do you do when you're not good at something? Do something else, keep on keeping on and practice!

The tools/products are also important. I find that an angled brush makes the job 123483% easier. A cream or gel liner as opposed to a powder is also my go to because it glides much like paint. 

I use an elf brush and cream liner. I am not one to spend a lot of money on makeup. The bargain shopper in me just can't do it! The total for these products is a whopping $6. Haha, yes, S-I-X dollars. And let me tell you, I swear by these products (which I buy at Target, of course)! The brush works perfectly and is long lasting. The cream eyeliner is smooth, rich in pigment (there is nothing worse than having to keep retracing a perfectly done line for more color, that's a disaster waiting to happen, for me at least),  long lasting, and it doesn't run or smudge (Hallelujah, AMEN).


Find your perfect products here!

elf Angled Brush (I use this)
elf Cream Eyeliner (and this)


Coat all sides of the brush with cream liner, remove excess for a smoother, finer line.


Start at your upper lash line where your inner lashes begin, draw a fine line across.


Start in the middle of your upper lash line and begin to draw a line upward and extend past the outer lashes.


I like the look of a gradual wing. I accomplish this by creating a thicker line toward the outside of my lashes. Make sure it's a continuous line, it should look like one stroke outward and upward.


Voila!


Notice the gradual increase in width.
A simple eye, brows and a statement lip is my new favorite face look.


Thank you for reading! What eye-lining tips and secrets are you keeping?

XO-Courtney

For more makeup looks check us out on Instagram - Courtney_m_b & KelseyMKipp