Saturday, January 25, 2014

Roll Up Your Sleeves, and Get to Work

My apologies for indoor shoots lately! I know they are not the best of pictures but I can't bare this skirt in negative temperatures--Buffalo Blizzard of 2014, anyone?! Ugh--cold weather, or any excuse, cannot pardon a mess of a work attire. Instead of giving up a stylish office look, try adding layers (and bring save the heels for once you get into the office). 

Welcome to my in-home office!


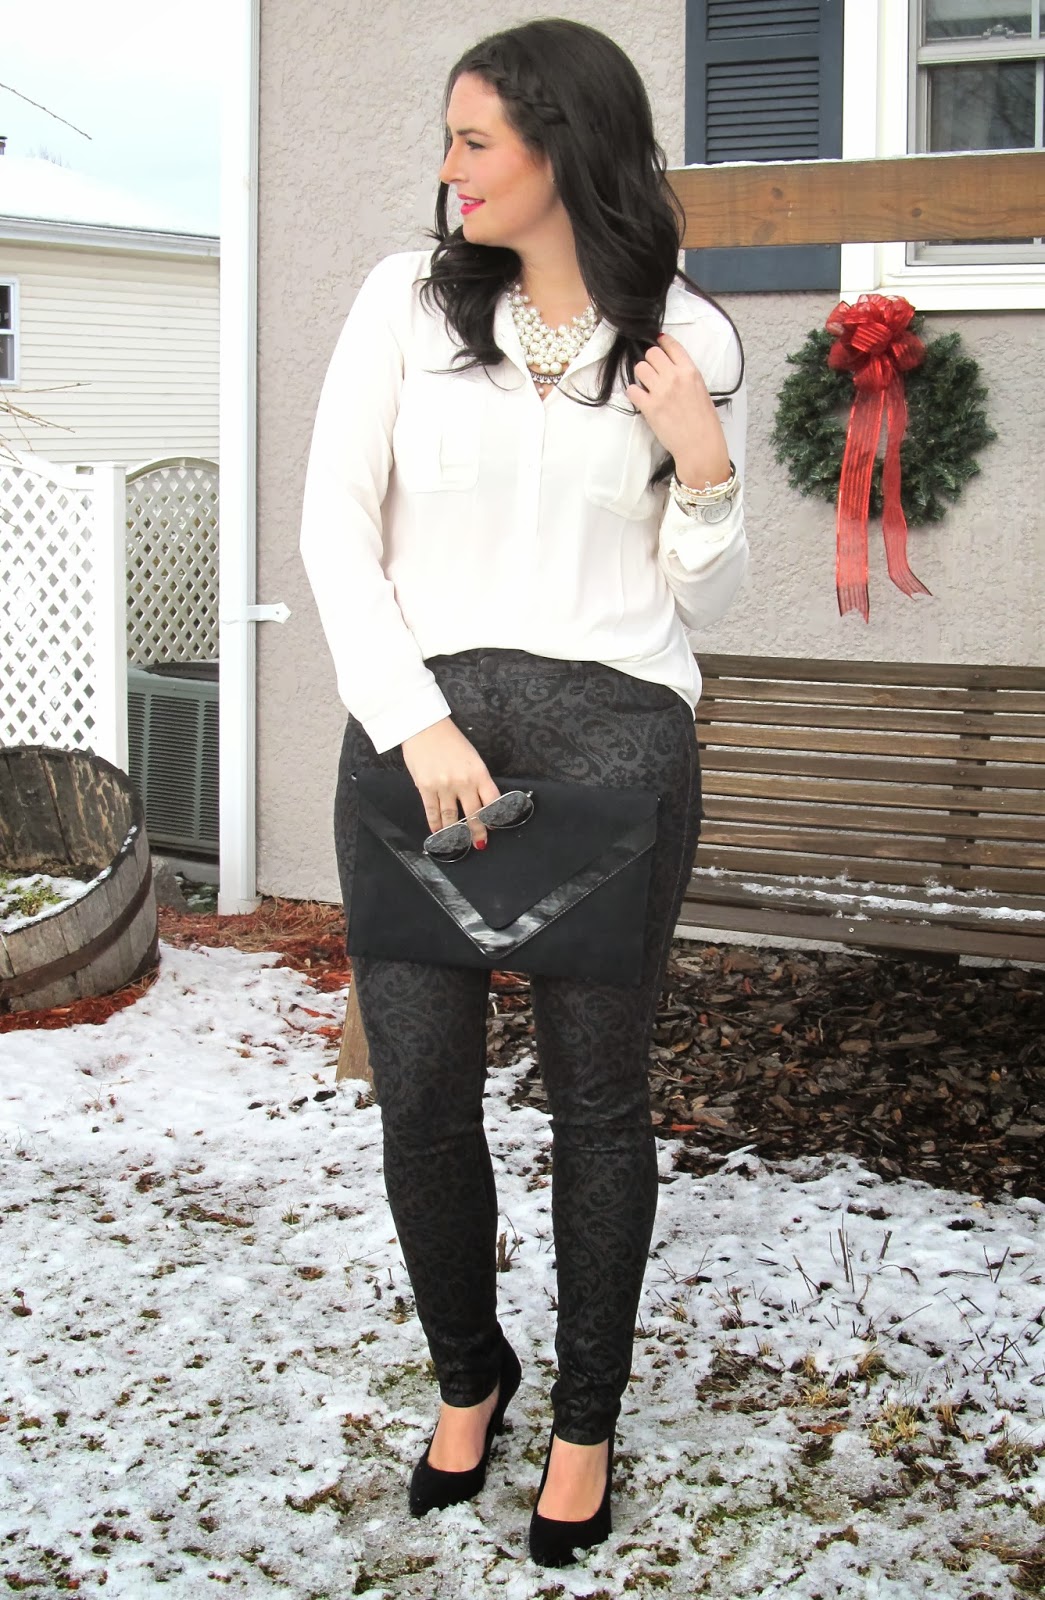
Sequins Limited old (similar here) // Button Down H&M // Skirt Target I have several colors! // Shoes old-love these // Bracelet here // Earrings OASAP //

When the seasons change, many people pack up their non-season wardrobe and store for next year. Not me! I keep everything out... all of the time. This short sleeve sequins top can be layered, of course, under a cardigan, but it can also be thrown on top of a great button down. {PS I own like 4 white button town shirts/tunics--they are a close must}. Sequins... in the office?! YES! This sequins top is just a bit of sparkle, limited to the front, and the black color is work appropriate. Now, of course, I could throw on some destroyed denim and zebra print stilettos to take this top out for a night on the town, but it's all about what you pair it with. White button down and a pencil skirt--ready for work!

Side note: I almost always unbutton and roll up my sleeves. I find this to be more, well me! Polished but very effortless. And, how else could I fit my arm candy? 

Thanks for stopping by! Stay warm!

--Kelsey

Follow us on Instagram @KelseyMKipp and @Courtney_m_B

Friday, January 24, 2014

When Pants Become an Accessory


Don't get me wrong, I am a total jeans girl. I would wear jeans everyday if it were allowed. However it is reallyyyyyyy easy to get stuck in an outfit rut with that mentality. So, I like to find jean-like pants with a little edge. This could mean a great pencil trouser, a colored jean, a patterned jean, and my personal favorite, a textured pant! I mean, come one, these pants speak for themselves. They say, "Hey, look at me, I am confident, cool, edgy, comfortable, chic, and classic." Well, the pants don't say that, but my inner voice does when I am wearing them. Good enough for me! 

So, I challenge you...step out of your normal jeans/pants box. You'll be surprised how Polished and trendy you will feel! Start small, try a colored jean first. Once you feel the magic in those, try a patterned jean. I have seen some beautiful understated patterned denim in stores like Target and American Eagle. When you are trying out a new trend or challenging yourself to step out of your comfort zone, I suggest checking out these stores first for affodable, guilt free options...in case you don't like your new look, but I don't think that will happen :). Once the patterned jeans are your new thing, take it a step further and try a textured pant. These things are accessories in their own right. I love a piece of clothing with personality, especially a fearless and confident one!


Outfit Details: Pants-American Eagle (Similar here and here in wine) // Blouse-Loft (Similar here) //  Shoes-Zara // Clutch-H&M (LOVE this bag) // Bracelet-Charming Charlie // Watch-Michael Kors // Sunglasses-Ray Ban  // Necklace-NY& Co (Similar here)

As always-thank you for stopping by! 

Let me know your favorite type of statement clothing!

XO-Courtney

Instagram: Courtney_m_b & KelseyMKipp


Thursday, January 23, 2014

Too Faced {Mascara}

Although I am not one for a New Years Resolution, I love the idea of changing up your boring routine. You know the ones on auto pilot. How often do you run out of a beauty product and simply pick up a refill, of the same product you have been using for years? Not me--I am always looking for hot new items that are made for trendy girls who want to Polish off their look.

Here is what I found--Better Than False Lashes! Promise!

The Too Faced Product has 2 tubes of mascara. The gold tube is step 1 & 3--start and finish with the actual mascara. The white tube is step 2--extensions in a bottle.

No matter what mascara you use, ladies, don't skimp on this step. CURL YOUR LASHES! You can pick up an eye lash curler anywhere!

Hopefully, your eye lashes are curled and ready for step 1. Apply Step 1 (gold tube). Bonus? The wand it angled. First, I like to tilt the brush up {pictured} and wiggle into the base of my lashes. Once my lashes are coated, I turn the angled brush around and apply a layer on the BACK of my lashes. Yes--the part you can see when my eyes are closed.

Step 2-the extensions. Hope you can see the little white fibers on my upper eye lashes. I only apply this to my upper lashes because when both were coated, they stuck together a bit when I blinked! 


After you repeat with the gold tube (step 3), here is the difference! I have to admit the pictures do no do it justice!! It's simply amazing in person--you must try it!


Before...
After!


Top here for $9 // Earrings and Belt Francesca's Collections // Link Bracelet Target and Diamond Bracelet Brina Box // Denim Express // Booties Nine West // Mascara here // Lips Mac Rebel //

When eyelash extensions first made their debut, I was thrilled! After a little research, my excitement dissipated... For girls who like low maintenance (like don't curl or wear mascara daily) it's a PERFECT solution! For me, not so much-- I wear a lot some eye makeup, so I don't want to be worried about my investment off my face. Thankfully, I stumbled upon this Too Faced Mascara! 

Voluminous, lengthy and thick lashes? Who wouldn't love that! Let me know what you think!

--Kelsey

Follow us on Instagram @KelseyMKipp and @Courtney_m_B

Wednesday, January 22, 2014

Neon With a Side of Mint Please


Let's just bask in the glory of this necklace for a second...

Did you take it all in?

I am completely in LOVE with it! First of all, I LOVE mint and what an amazing chance to wear mint all year round! Second of all, I LOVE the Aztec trend happening right now. Thirdly, it is just beautiful! 

Statement jewelry is all over the place right now! Sometimes I find myself having a difficult time finding the perfect piece because there are just so many options! Stumbling upon this piece by Shamelessly Sparkly solved all of my problems...jewelry wise, anyhow ;).

Let me just sing my praises for darks and neutrals for a second. I love them and 90% of the time I will gravitate to them first, especially in the winter. This piece, however, inspired me to brighten up my look. I mean, lighten up Courtney, it's only winter (see what I did there?). This neon sweater is sort of like a slap in the face of color. I mean, it is seriously bright...in a major way! I am so pleased how the necklace ground the look. A neon this bright with the wrong accessories can lean toward...overdoing it. But with the cool tones of the necklace, the neon look is instantly Polished.


Find this stunner at Shamelessly Sparkly! Check out the website for this beauty (under $20!!!) and so many more! 


Outfit Details: Necklace-Shamelessly Sparkly c/o // Sweater-Forever 21 (Sold out online...similar here) // Jeans-Express // Booties-Jessica Simpson // Sunglasses-Charming Charlie (similar here) // Clutch-Francesca's (similar here) // Spike Bracelet-Francesca's (similar here) // Ring-The Limited (Love this one)

What's your favorite way to wear neon? Comment below!

XO-Courtney

Instagram: Courtney_m_b & KelseyMKipp


Tuesday, January 21, 2014

Winter Bliss


Turtleneck JCrew // Denim Express // Jacket Loft-similar Old Navy // Vest Aeropostale // Boots here // Statement Necklace Shamelessly Sparkly // Bag Francesca's Collections // Mittens H&M //

Have I mentioned I live in Buffalo? You know, home of blizzard weather. Last week, we experience the Vortex of 2014--city shut down, state of emergency, complete white out! Well, thankfully the snow belt has passed but it is C-O-L-D. Needless to say, layering, mittens, and boots have become essential, literally! So, I make no excuses for living in my fur. It feels even better knowing I only paid $20 for this winter white vest!
 
Since my winter bliss attire is full of layers, I needed a piece of jewelry to Polish it off. I chose this statement necklace from Shamelessly Sparkly. Ode to the statement necklace-such a selfish piece, isn't it? Even wearing multiple layers, patterns, destroyed denim, and still it steals your attention. Isn't it FABULOUS!? Doing what it does best... making a statement! Check out their website, I am so glad I found it :)
 
--Kelsey
 
Don't forget to follow us on Instagram @KelseyMKipp and @Courtney_m_B


Monday, January 20, 2014

Take Your Hair From Blah to TA-DA!


Ever feel like you hair is just screaming, "blah, blah, blahhhhhh?' Well, I do. Sometimes I get stuck in a hair rut and we all know how difficult it is to get out of it! I mean some people have been wearing their hair the same way for decades! My hair ruts only last about two weeks, so I guess I'm just being dramatic, oops! So, here's a quick way to take a look from "blah" to "TA-DA"!

Section hair off above your ears. Take inch-wide pieces of hair and wrap them around the iron or wand away from your face. I use a 1 1/4 inch curling iron by John Frieda.

 I sometimes twist the section of hair and then wrap it around the barrel. This creates a much more relaxed wave.

Wrap your bangs and hair close to your face all the way to the root, it adds volume to the front of the face. 

Flip your head upside down and shake it out. Spray lightly for hold, not helmet!
TA-DA!
I love the look of loose, wide waves. It is a refreshing and simple change from my normal blow out or curled hair. Not to mention, it is easily maintained, and still Polished!


 I like a challenge, people. Take your hair from "blah" to "TA-DA," I've got that covered. But take your hair from "TA-DA" to..."TA-DAAAAA," requires some thinking. Whenever I leave the house, I always come prepared with hair ties, bobby pins, and of course...a tease comb (check out my tease post, here). That way, whenever I feel like it, I can always do something a little extra to my hair. So for this post, I used my girl, Courtney Kerr (I haven't told her that we are BFF's, yet...shhhh) as an inspiration. She is from Texas and I am from New York. I've said it before and I'll say it again, the higher the hair...the closer to heaven is just not a motto that I live by. But, she does! Her teasing is sky-high and props to her for rocking that look. But, it's not me, so here is my take on Courtney Kerr's teased, center parted, half up-do (...I haven't perfected that name yet). 


Pin front pieces of hair under the crown of your head. 
I criss-cross the bobby pins for more support and security without having to wear too many. 

Use the back end of a tease comb to pull up and add height. The tease from before will support this upward pull and keep your hair where you want it. 

Use spray to smooth the front of the hair. Sometimes I spray my fingers and use them to smooth my hair to avoid a wet or crunchy look. I like this part to be smooth because it offsets the height of the back for a more dramatic look. 


TA-DAAAAAA...times two.


 As always, THANK YOU for stopping by! Please share your comments or ask any questions below!

XO--Courtney

For more hair tips and tutorials, check out our Instagram pages Courtney_m_b & Kelseymkipp